|
|
|
Who's Online
There currently are 6043 guests online. |
|
Categories
|
|
Information
|
|
Featured Product
|
|
|
 |
|
|
There are currently no product reviews.
 ;
Delivery came quite promptly and in a very readable format. Thank you.
;
I found my Clarion VRX8370R in the Camper I bought and I wasn't able for month to understand it.
The Owner Manual was perfect and just what I was searching for.
Thank you.
Leonardo
;
Very good copy of Manual, clear and easy to print off, arrived very promptly and reasonably priced.
Thanks, I will use you again.
;
Zeer duidelijke afdrukken op A4-formaat , zeer uitgebreide handleiding . Pluspunt ,zeer snelle
respons van jullie , binnen de 24h . Top !!!
;
I AM HIGHLY IMPRESSED BY THE EASE OF USE OF THIS DOWNLOAD SERVICE. INSTRUCTIONS ARE CLEAR AND SIMPLE TO FOLLOW....EVEN BY TECHNOPHOBES SUCH AS MYSELF. THE EMAILS POINT YOU IN THE RIGHT DIRECTION...ITS SO EASY PEASY. THE DOWNLOAD CHOICE OF USER MANUALS IS EXTENSIVE AND I COULD NOT FIND A CHEAPER OR MORE EFFICIENT SERVICE ON THE INTERNET. I COULD NOT HAVE MADE A BETTER CHOICE OF INFORMATION PROVIDER. SHOULD I EVER NEED ANOTHER USER MANUAL, THEN THIS IS THE FIRST CHOICE SITE. COULD NOT BE BETTER PLEASED!!!!!!!...MANY THANXES FROM JIM BURNS
EN11
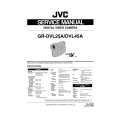
Power Zoom Lever
Grip Adjustment
1 2 3
Recording Start/Stop Button
Separate the Velcro strip. Pass your right hand through the loop and grasp the grip. Adjust so that your thumb and fingers can easily operate the Recording Start/Stop Button and the Power Zoom Lever. Refasten the Velcro strip.
Viewfinder Adjustment
Dioptre Adjustment Control
1 2
Power Switch
Set the Power Switch to � � or � �. The power lamp comes on and the camcorder is turned on. Slide the Dioptre Adjustment Control until the indications in the viewfinder are clearly focused.
Shoulder Strap Attachment
3 2
1
1 4
Following the illustration, thread the strap through the eyelet 1, then fold it back and thread it through the buckle 2. Repeat the procedure to attach the other end of the strap to the other eyelet 3, making sure the strap is not twisted. Adjust as shown in the illustration 4.
2
Tripod Mounting
1
Align the screw and camera direction stud on the tripod with the camera�s mounting socket and stud hole. Then tighten the screw.
CAUTION:
When using a tripod, be sure to open and extend its legs fully to stabilise the camcorder. To prevent damage to the unit caused by falling over, do not use a small-sized tripod.
GETTING STARTED
 $4.99 GRDVL25A JVC
Service Manual Complete service manual in digital format (PDF File). Service manuals usually contains circuit diagr…
|
|
|
> |
|